
It's not uncommon for nonprofits to face both an influx of donations and a simultaneous extreme surge in demand for the services they offer. When the services non...
At the breakout of the war in Ukraine, the Ukrainian Red Cross faced a problem: being overwhelmed by donations. With Salesforce, they were able to build an automated, multilingual, donor experience with integrated multi-currency payments. This not only solved the problem but also allowed them to focus on the lifesaving support their organization provides. As I listened to how they used Salesforce to meet the influx of donations, I couldn’t help but wonder: how did they handle getting this into their accounting software and ultimately financial reports?
A time-consuming process or duplicate data entry may not be concerning when transaction volume is low, it’s likely manageable. Scale transaction volume by thousands or hundreds of thousands and the previously innocuous problem becomes a monster.
It’s not uncommon for nonprofits to face both an influx of donations and a simultaneous extreme surge in demand for the services they offer. When the services nonprofits provide are needed most, the last thing you want is to be spending all your time on the administrative side. That’s where technology steps in.
So, you might be wondering, how would we get the donations from Salesforce to Intacct? We’ll cover the first option in this blog and the second, a journal entry integration between Salesforce and Intacct, in the next.
Option 1: Custom Salesforce Report and Other Receipts Import
Build the Report Type
Why do we need a report type and what are they? Report types in Salesforce allow you to create custom combinations of objects for reporting. For example, combining objects like opportunity and payments, or opportunity and GUA Allocation in one report. They also, in our case, will allow us to rename headers so that the report, when exported, can easily be imported to Intacct with no manipulation.
Step 1: Go To: Setup (gear icon) > Type “Report Types” in the Quick Find > Select Report Types

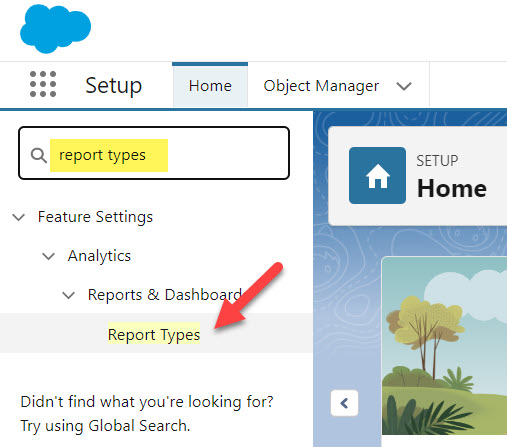
Step 2: Click to create a new custom report type and fill out the following required fields:
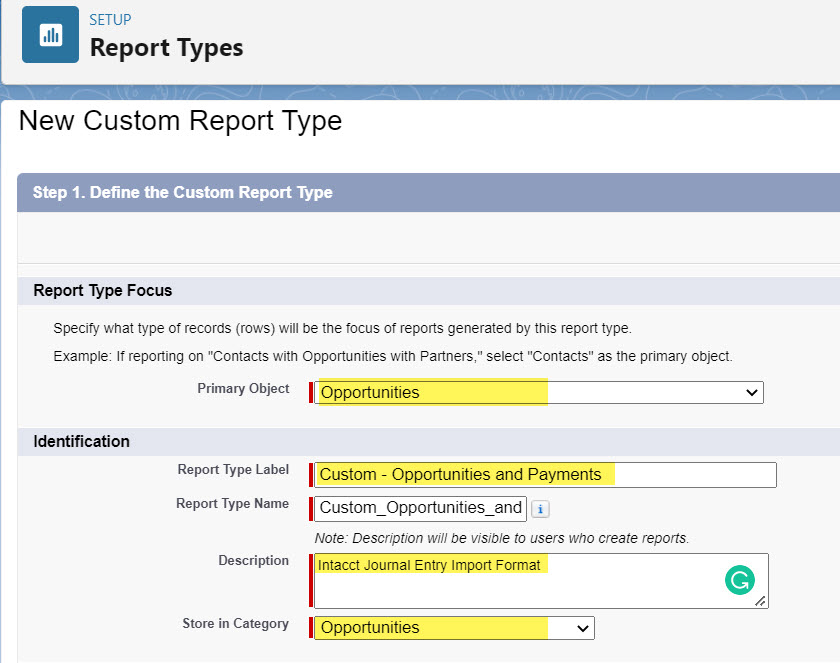
Make sure to mark it as “Deployed” at the very bottom of this page.

Step 3: Add the Payment object to the B dropdown and click save!
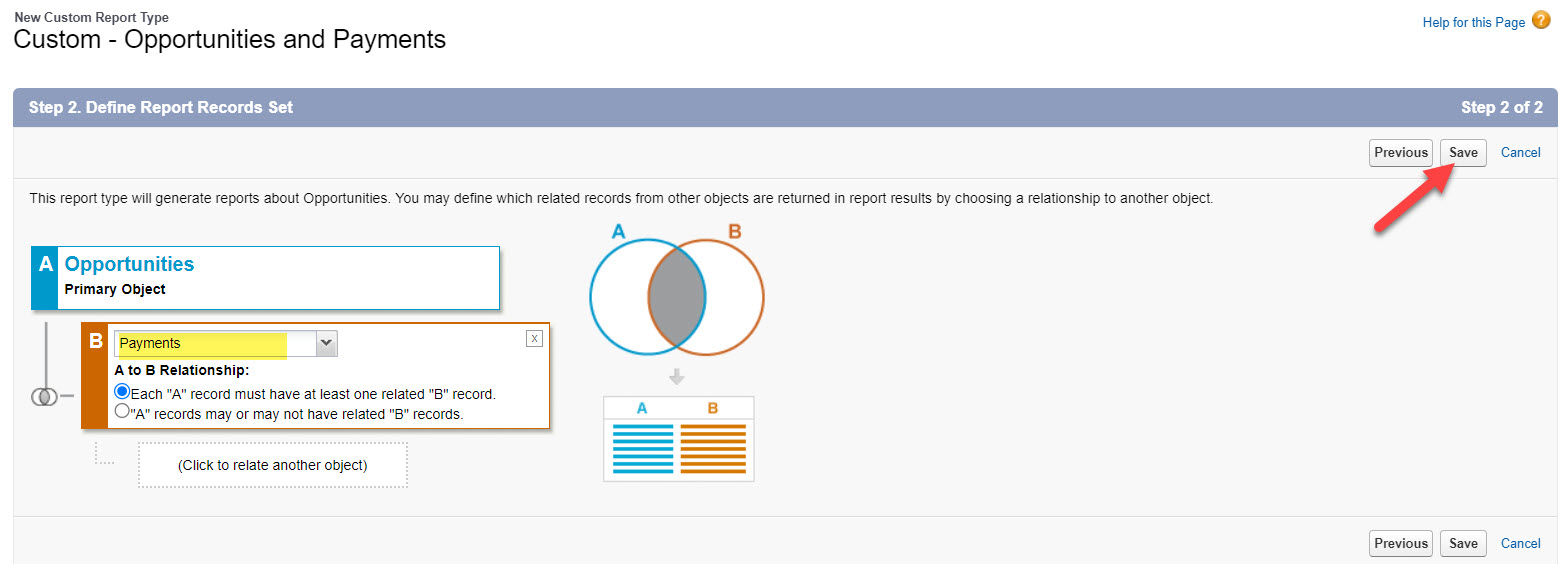
Step 4: Click Edit Layout > Click each of the following fields and the Edit Properties button to update the column name and include it in the report by default:

- Close Date = RECEIPT_DATE
- Intacct Payment Method* = PAYMETHOD (Note: this is a custom formula field, as Intacct’s required value for checks is “Printed Check” while Salesforce’s value is simply “Check”).
- Payment Date = DOCDATE
- Payment Number = DOCNUMBER
- Intacct Deposit To* = DEPOSITTO (Note: this is a custom picklist in case we ever need to deposit to an undeposited funds account, but in our scenario we always deposit to the bank, so we’ve made that the default selection).
- Intacct Bank Account ID* = BANKACCOUNTID (Note: this is a custom field added to the payment as a picklist with just one value since we always deposit donations to the same bank account.)
- Intacct Line Number* = LINE_NO
- Intacct Account Number* = ACCT_NO
- Payment Amount = AMOUNT
- Intacct Location ID* = LOCATION_ID (Note: in our environment since we don’t have the Intacct integration in place yet, we’ve added a custom field to hold the required field: Location ID. This is just a custom picklist on the opportunity).
- Account Name = PAYER_NAME
- Opportunity ID = ITEM_MEMO
* All fields noted with an (*) are custom fields added to either the opportunity or payment for the Intacct import template.
Note: We highly recommend working through the field mapping in your own environment as the fields I have noted above, while they may work in our test environment, Salesforce is customizable and you may have different sets of fields to map. Also, these are fields required for the Intacct Other Receipt import template, however, if you were using the Journal Entry import instead, you could certainly include those fields.
Build the Report
Step 1: Go To: Reports > New Report

Step 2: Select Opportunities on the left > Search for “Custom – Opportunities with Payments” > click Start Report
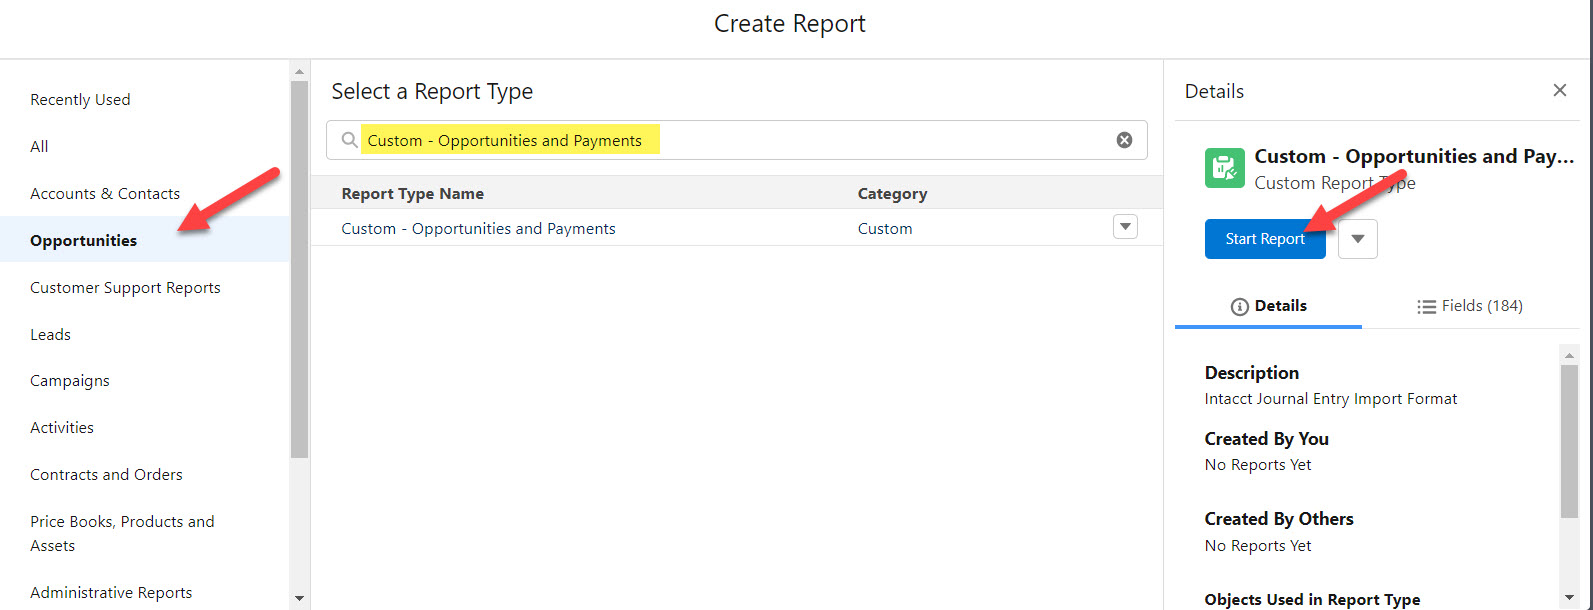
Note: for this example, we’ll assume you are using opportunities and payments in Salesforce. If you are using other objects like GUA’s, the report is still possible so please reach out to our team for guidance!
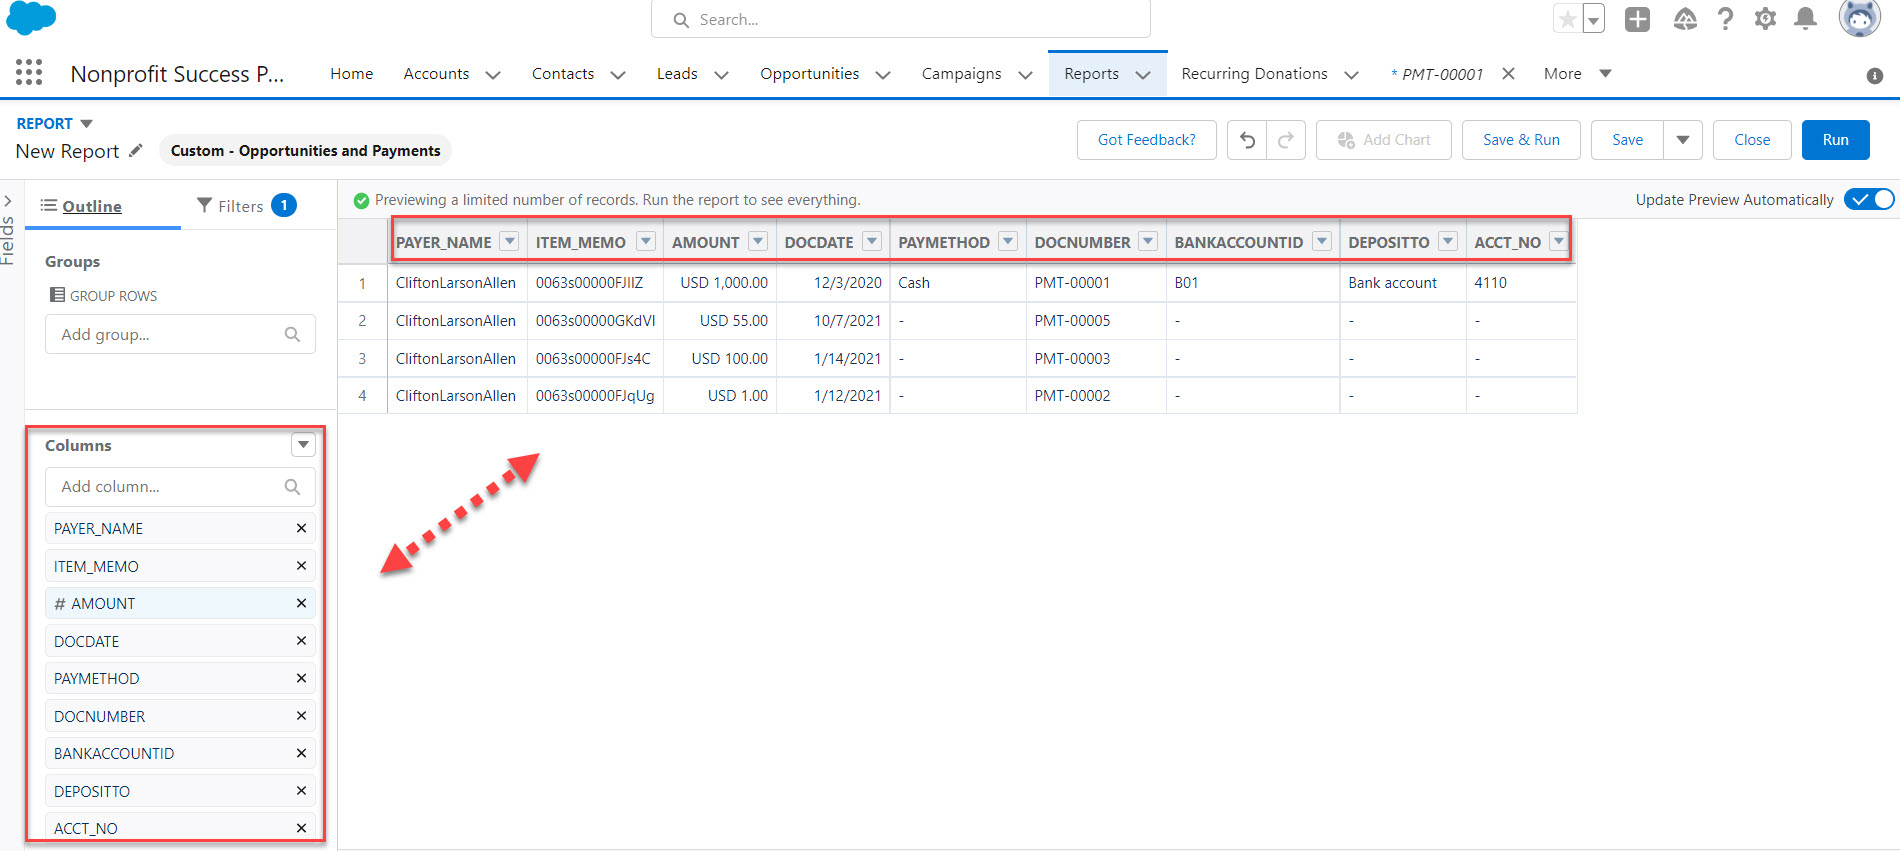
Step 3: On the left-hand side, the columns we configured in the report type should already be included, but you can add additional fields as columns as well. Here, you can also drag and drop the columns to the appropriate order for Intacct’s import template.
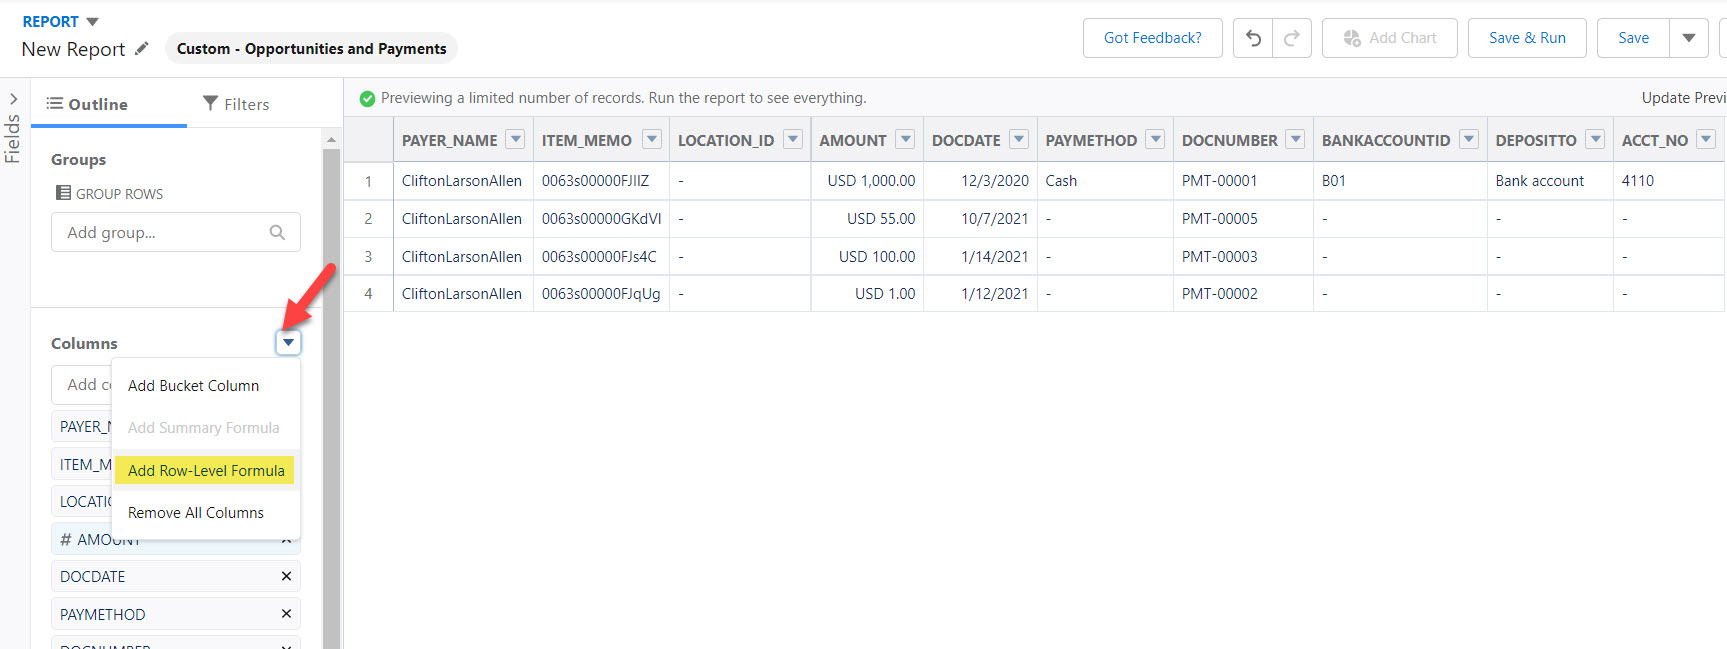
Step 4: Add a column as Row-Level Formula for the Receipt Date. Click the dropdown next to column > Add Row-Level Formula. Then insert the formula below.

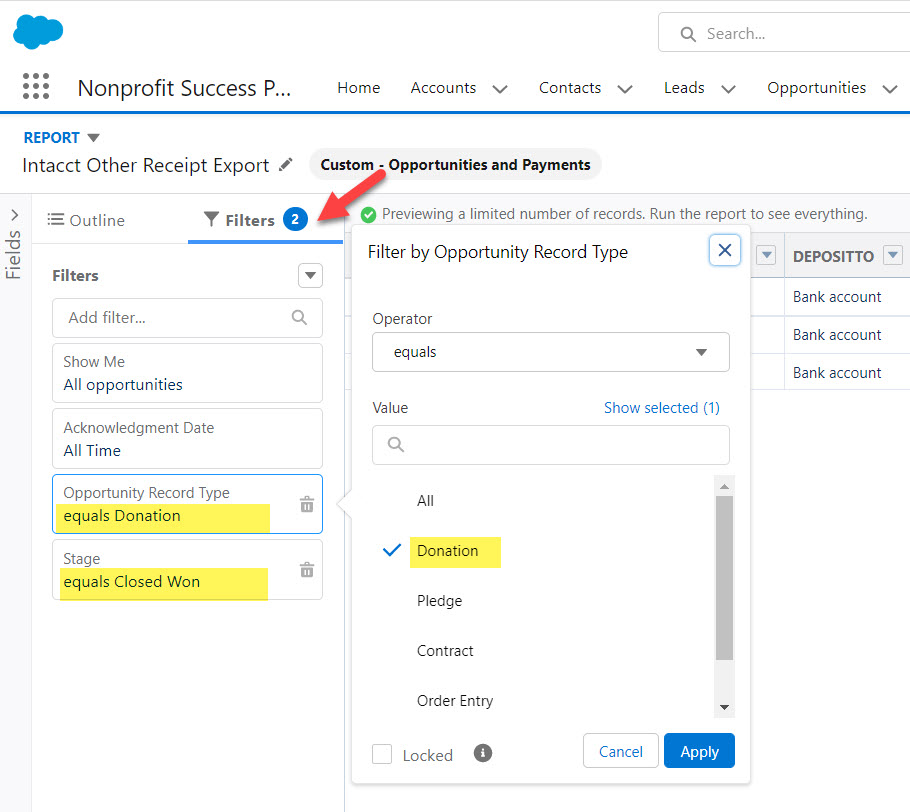
Step 5: Add filters by selecting the filter tab and add a filter for:
- Record Type = Donation. For this report, we only want to import donations as other receipts, excluding grants or other types of larger opportunities. Those will follow a different process.
- Stage = Closed Won.
Save and Run the Report
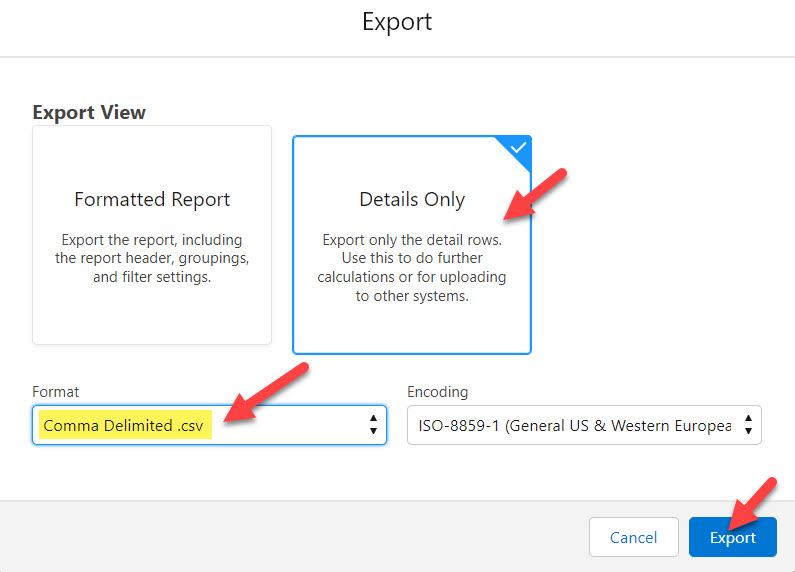
Export the report to CSV and test importing to Sage Intacct (in a sandbox ideally!). Need tips on troubleshooting Intacct imports? Check out this blog post next!

What’s Next?
Subscribe to be notified when our next blog comes out, where we’ll outline solving the sudden influx of donations with a Journal Entry Integration with Sage Intacct.
The post Modifying Processes with Technology to Accommodate Scale appeared first on Sage Blog.
Want to learn more? Complete the form below and we'll be in touch. If you are unable to see the form below, please complete your submission here.Contact us
